Saturday, December 31, 2011

Alice Ogden - Christmas Ornament 2011

I almost forgot to post about my 2011 Christmas ornament basket from Alice Ogden. I actually almost forgot to order mine this year too. I normally contact Alice right around Thanksgiving, but with the way the time flew by this year I didn't get my check in the mail until right before Christmas. Of course I wasn't too worried since I have my basket tree up in my work room all year round.

This year's basket is so cute. I don't think my photograph really shows how small and delicate the basket really is. At 2.5" in diameter by a bit over 1.5" tall with a hand carved heart shaped handle it is a real beauty.

Playing

Just playing with Mom's new camera Dad got her for Christmas. It is a Nikon digital SLR with a really great telephoto lens. I was sitting inside looking out the family room window when I captured these two gold finches at the bird bath. I really want that camera! I will have to start saving up my pennies.

Friday, December 23, 2011

My collections

Well I tried to take photos of my whole collection and couldn't. I think that may mean I have too many, but I love Santas and snowmen. I like a variety of styles, but especially like hand-made ones, either that I have made myself or have bought at craft fairs. 

Here are some of my snowmen lining the top of my entertainment center. The resin snowmen on the left I painted myself. The large snowman on the left is a counted cross-stitch 3D figure that I made ages ago (I only did the cross-stitch, I had someone do the 3D construction).

 
The snowman on the left, with the kookie tie is a wood cutout that I made at one point when I was into folk art painting. I made a bunch of different ornaments and figurines, but sold most of them. Of course I never made anymore, so I think only have two left.

 
All of the pencil Santas I painted myself, back in the day when you could buy unpainted resin figurines. I used to add a few every year to my collection, but probably haven't painted a new one in 10 years. I had my dad make me the ledge to display them on and it is full now, so I guess it is good I haven't made any more.

The Santa faces painted on the cones and eggs I bought over a number of years from a women who had a booth at a pumpkin fest in a tiny town near my home town. My mom has a bunch of them too, as well as some plates and other items she had painted on. A couple years ago we weren't able to go and the women was so worried that something had happened to us that she emailed my mom to make sure we were OK. I guess we were good customers.

I should try to take a photo of my mom's collection. She makes me look like an amateur.

Tuesday, December 20, 2011

Happy Holidays!

Some photos of my living room mantle. My dad bought me a box of vintage houses that I just love. I am always looking for more, though I never seem to run across them. I keep threatening to make some myself and I found patterns for some from Martha Stewart, but have yet to try them. I also love bottle brush trees. I have collected quite a few of those now, both new and vintage. These I seem to run across here and there and I will pick them up if they aren't too expensive. I have just been playing with bleaching some of my new ones and adding glitter. I want to try dying some of them too and adding some mercury glass balls or little fruit (I love the tree in the second photo with all the fruit and glitter).

I like a display like this since it is and it isn't Christmas. Since it is "wintery" I don't mind leaving it up after the holidays are over for awhile. Also it is such a pain to put them all away I am never too excited to get started.

I hope everyone has a wonderful holiday season and gets to spend some time with their family and friends.

Monday, December 19, 2011

My 2011 Christmas Cards

Every year I say that I am not going to do a complicated card and every year they seem to get more involved. This year's card was a lot of work, but I was very happy with the way it turned out. I tried a bunch of new techniques and used some new materials so even though they were time consuming, it was fun creative time. I decided to do a tag this year instead of a traditional fold-over card and my hope is that the recipients will keep them to use as decorations to hang on the tree. I know, I have my extra card hanging on mine.

One of the new materials I used on these was Perfect Pearls Mist. It adds a nice ice shine to the paper and even to the seam binding ribbon tied to the top of the tag. Another new discovery was butcher's twin, you know, the stuff you tie up a piece of meat with or sew up a turkey with. It is so inexpensive (when you buy it from a cooking store) and yet it adds a nice holiday touch in red and white.

So let's see, the techniques I used on this card include: direct to paper inking; stamping; embossing; and edging with ink blending tool. The materials I used include: manilla shipping tag; card stock, Distress Ink pads; clear embossing powder; butcher's twine; seam binding tape; tiny attacher staples (dyed with alcohol ink); ATG tape gun; shape punch; and "vintage" tinsel garland.

Wow, I am tired just listing all the stuff I used to make these. Next year they will be less complicate, really, they will...

Saturday, December 17, 2011

Holiday Work Gifts

I usually make my work gifts and this year I decided to make some stamped card sets. These were copied from a Tim Holtz project, so I can't take credit for the idea. They were fun to make and relatively quick too, even with the stamping, embossing and edging. Tying the silly butcher's twine was the most tedious step in the process. A friend and I assembly-line made dozen's of these in one evening. We decided that sets of eight would be good and I had some plastic boxes that I had bought one time on sale cubbied away so used those and tied them up with butcher's twine.

Grayson is always ready to lend a helping hand, or paw as the case may be. The twine was just too much for him to resist. Fortunately I got everything boxed up before he slobbered all over the cards.

Sunday, December 11, 2011

Christmas Cards 2011

About to get my Christmas cards completed for this year. Of course I am behind schedule, but when isn't that the case. I think I have all the parts stamped. Now it is time to start assembling. This year I went with a "tag" design instead of a traditional folded card. I am using a bunch of new techniques, so they have been fun to work on. So far I am pleased with how they are turning out. Of course I always say this year will be the year I make a less complicated card, but so far they seem to only get more involved.

Now to just finish them up, get them signed, addressed and into the mail. I'll post a finished card after they get mailed out, don't want to spoil all the surprise!

Monday, December 5, 2011

Vault Gallery Exhibit


I was honored when my childhood hometown Chamber of Commerce asked me to display my baskets for the month of December. The Chamber is now housed in an old bank in the town square and they turned the old vault into an exhibit space. While small, it actually makes for a nice exhibit space. Mirrors on both ends makes the room seem larger than it really is and the old lock boxes add an interesting backdrop. If on some odd chance you happen to be in Mexico, MO during the week this December be sure to stop by for a look. If you can't make it, here are some photos of the display.

Thursday, November 24, 2011

Happy Thanksgiving!

Hope everyone has a very happy Thanksgiving. I am spending mine with my family and we are doing all our traditional cooking and more importantly, eating! One of our family's specialties is the way we prepare our dressing. Instead of stuffing the turkey, which I think makes it a mushy mess, or baking a big dish of dressing, where only the corners are nice and crispy, we make individual servings ... what we call "dressing balls". It is my responsibility to mush everything up with my hands and scoop them onto cookie sheets. Not only are they perfectly crispy all around they are also perfect to reheat for all the great post Thanksgiving leftover meals.

I give you, the Badaracco/Stubblefield Dressing Balls™ ...

Dried bread, cornbread, sage, etc. dressing.

Saturday, October 29, 2011

Happy Halloween

I recently got a Sizzix Big Shot embossing and die cutting machine. I am having so much fun playing with it. I try to make Halloween cards to send out (I don't always get it done though) and my new toy was the perfect excuse/motivation this year. On of my basket buddies also turned me onto Distress Ink stamp pads and showed me some new techniques and tools. So, here is what I came up with.

Click to enlarge

Saturday, October 15, 2011

2011 JoAnn Kelly Catsos Worshop

Wow, what a busy couple of months I have had. The high light of the month had to be the workshop I hosted with JoAnn Kelly Catsos. I had fourteen very happy weavers at my house for three days of fun. We made two baskets in class, a lovely 4" twilled bowl and either a 4" or 6" Shaker inspired captured lid cathead basket.

JoAnn displays the two patterns that we could choose from for our first basket.
Diamond Reflections.
Black Diamonds – of course I had to make both versions.
Working on the lid to my 6" captured lid cathead.
I made a special basket that was a scaled version of a #9 Shaker captured lid basket.
JoAnn shared her birthday during the workshop so of course we had to celebrate.
It was only appropriate that we embarrassed JoAnn as much as possible.
My completed basket along with the lid mold I custom made.
My new 6" basket along with the #9 Shaker I made back in 1989 with Martha Wetherbee.

Sunday, August 28, 2011

Basket Ring

Basket Weave Wedding Band in 14 Karat Yellow Gold
Continuing with the basket wedding theme here is a basketweave ring. I was really surprised I didn't find more rings with a woven pattern. There are so many pendants with baskets, many of which are actually woven of metal, not just cast.

Covered Swing Handle Basket
Hand forged and hand woven in 18k & 22k gold.
size: 1 1/4 in. dia. x 7/8 in. h. (1 1/2 in. o.h.)
from Stephen Zeh


Tuesday, August 23, 2011

Cake Basket

25.5" x 15.75" diam.
Wedding Cake Basket
1986  
Mary Adams
Fort Covington, New York 1917-1999
woven sweetgrass and ash splint
Smithsonian American Art Museum

Last month I wrote about cakes that looked like a basket. I just ran across this basket, by Mohawk weaver Mary Adams, that looks like a cake. I think if I were going to spend thousands of dollars on a wedding cake I would much rather have one like this! What do you say?

Wednesday, August 17, 2011

Knotting Workshop

Pinball Dervish by Norman Sherfield
Just found another knotting workshop being taught by Norman Sherfield of Eureka, California. The workshop is being held at Gualala Arts Center, located at 46501 Gualala Road in Gualala, CA.

Knot This Way: 
Learn to create knotted waxed Linen sculptural objects
Friday - Monday
September 9, 10, 11 and 12, 2011
9:00 a.m. - 4:00 p.m.
707-884-1138
Contemplation by Norman Sherfield

Wednesday, August 10, 2011

I wanna take another class!

My set of Shaker boxes from John Wilson worshop

I haven't gotten to take a class in a while and I am itching to do one. While I still learn something new in any class that I take, the real benefit for me is getting away from the phone, the internet, the laundry and all the other distractions of modern life.

I ran across these videos today and oh how do I want to make a new set of Shaker Boxes. John Wilson is the gentleman I took a class from this past winter. It was a great class and so much fun. My nesting set of five boxes are aging nicely. The cherry wood is already getting so dark. You can really notice the change when you take the lids off and see the original color of the wood around the top of the box where the lid has shielded the wood from the light. Right now I have the boxes lined up in a row on the window sill facing the opposite direction to give them a sun tan on their fronts that have been facing into the room.

If you are curious on seeing how boxes are made here are a couple of videos that pretty much show you the whole process. This gentleman does a few things a bit differently than Mr. Wilson, but the overall process is the same as the way I learned.


So, if you ever get a chance to take a class, be it a Shaker box workshop or just a make-it-and-take it card class at your local craft shop, do it! Even if you don't learn something new, though I bet you will, at least it will get your mind and your hands working.

Sunday, July 24, 2011

2011 JoAnn Kelly Catsos Worshop

Saturday - Monday, October 8, 9, 10, 2011
9:00 am - 5:00 pm

I am so excited to be able to offer this workshop to make two beautiful baskets with JoAnn Kelly Catsos of Ashley Falls, MA. JoAnn has won numerous awards for her beautiful black ash baskets and in 1999 she was asked to weave an ornament for the White House Christmas Tree. She also was one of the first to receive the Certificate of Excellence Level I Basketmaking from the Handweavers Guild of America. JoAnn and her husband Steve produce all the weaving materials, hardwood rims and handles, and molds themselves. I hope you can join JoAnn and me for this exciting and fun class.


Black Diamond & Diamond Reflections
4.25" dia. x 1.75" deep
These charming twilled bowls are woven of natural and stained black ash splint. They feature a diamond design in the base, twilled sides, black waxed linen rim filler and lashed hardwood rims.

6" Quadrafoil Lidded Cathead & 4" Cherub
5" dia. x 8.5" high    4.5" dia. x 6.5" high
These baskets were inspired by an antique Shaker basket found in the Fruitlands Museum in Harvard, MA. Although smaller than the original, they contain the same classic design elements: the quadrafoil twill design and captured lid. They are woven of finely prepared black ash over two different molds and finished with hardwood rims.


Instructor: JoAnn Kelly Catsos

The workshop will include your choice of Diamond Bowls and 
either the 6" Lidded Cathead or 4" Cherub.

Diamond Bowl + 4" Cherub$285
Diamond Bowl + 6" Lidded Cathead$305


PLEASE NOTE
This is a three day advanced workshop
with quadrafoil twill experience necessary.
Both baskets are included in the workshop.


Contact: Tony Stubblefield
if you would like to receive registration information

Saturday, July 16, 2011

Walnut Wave

4"diameter
This is another basket kit I purchased from Marlys Sowers. It features a walnut base, solid rim and turned lid. The basket is woven of cane over cane (the kit included half-round reed uprights, but I substituted my own 5mm cane) with waxed linen. It was a fun basket pattern to weave. You are actually weaving with two different elements at the same time, a strand of cane and a length of brown waxed linen. It took a few minutes to get the pattern down, but once I got into the rhythm it was easy and fun to weave. I would really like to try this pattern again on another basket.

Sunday, July 3, 2011

Zebra Wood Vase

4" dia. x 9 3/4" tall
I bought the Marlys Sowers kit for this basket at the Stateline Weaving Retreat and finished it right after I got home. It features a zebra wood base, single-piece rim and lid; and dyed hamburg cane and flat oval reed. The basket is woven over a plastic tumbler which is glued to the base, so it is not only the mold, but also a liner for the vase. While the pattern looks complicated it is actually quite easy and fun to watch form.

Monday, June 27, 2011

Knitting Projects

Well, for those of you who follow me on Facebook you know that I am learning to knit. I found an etsy store, 
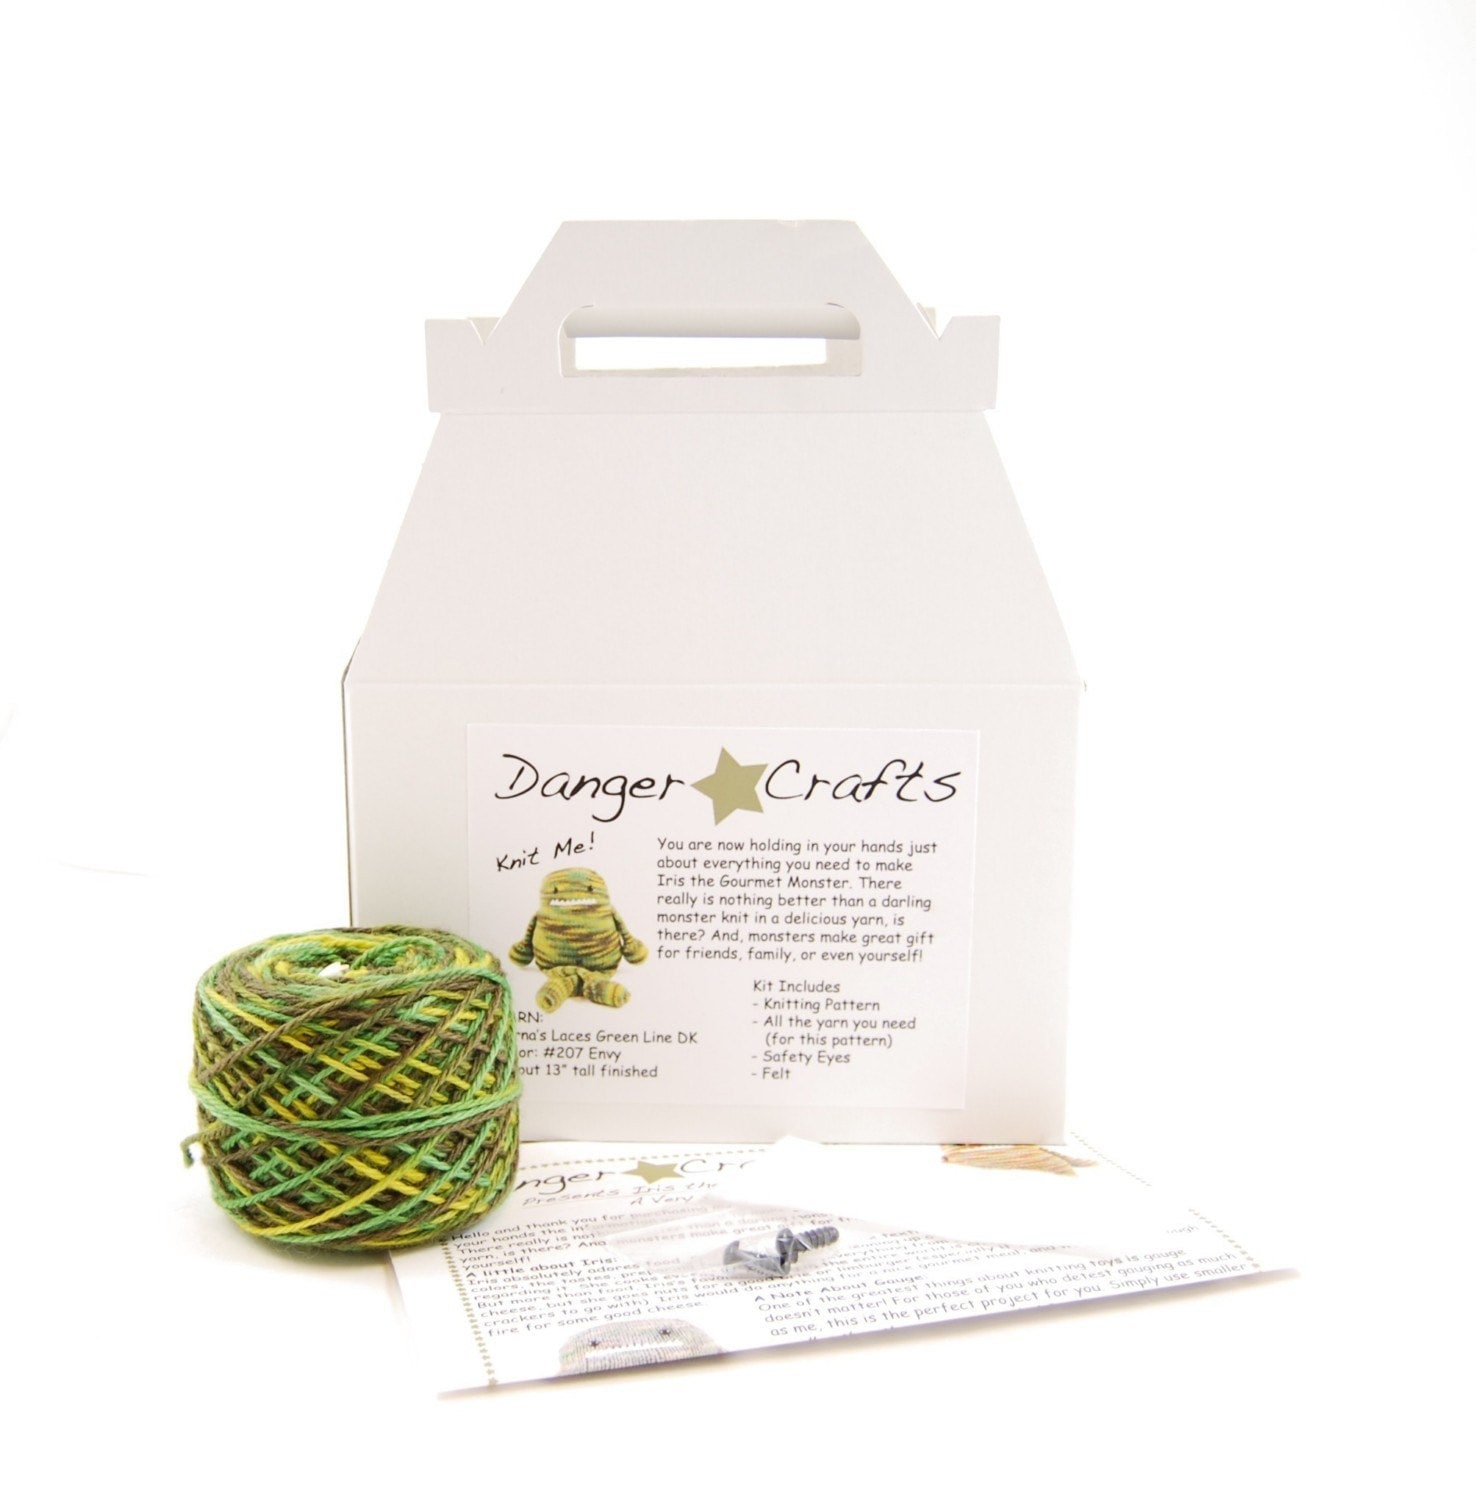
Danger Crafts, full of these very cute knitted monsters by Rebecca Danger and immediately thought of my grandmother. She was an immensely creative person who was constantly creating. She knitted, crocheted, sewed, just about anything you could do with your hands. One of my favorite childhood memories is of going over to my grandparent's house and where my grandfather would bar-b-que and my grandmother would turn my drawings into 3D stuffed toys.

Since my grandma had everything she really needed and didn't really want anything for Christmas we would always get her lots of yarn which she would knit into afghans, wash clothes, stocking caps and whatever struck her fancy. I knew that she would have gotten a kick out of knitting Rebecca Danger's monsters. Since my grandmother had passed a last October I decided that as a tribute to her I would learn how to knit myself and make one of the monsters.
I purchased a kit of one of the monsters, Iris and with the help of my mother, who is also an avid knitter (she owned a yarn and needle craft shop for over 25 years), I began working on my project. I started out with some inexpensive acrylic yarn that I had from my grandma.


Well after getting that far on my practice piece I decided to just keep going. Unfortunately I didn't have enough of the gold yarn so had to switch to another color and improvise a bit with the design. Here is the fruits of my labors. It isn't perfect, I messed up a few times, but I did learn a lot.
Of course I couldn't stop after just one so I bought 6 more patterns and downloaded 3 others. Here is the second of the monsters I completed. This one turned out as the pattern was written and I even learned a new technique, the "magic loop" which allows you to knit very small diameter tubes on circular needles.
This is Albert the Absent-Minded Monster. And here he is with his buddy, Ira the Sweater Monster (I had to change his name, since he was originally a she, but my finished version just didn't look like a girl).
I still have the wool yarn that came with the original kit for Iris and I am going to start that next since I think I have my basic skills down now. I will have to let you know how Ira's girlfriend turns out.

Monday, June 20, 2011

Eric Taylor Workshop Results

I finally had a chance to photograph the baskets that I made during Eric Taylor's workshop here at my home in St. Louis this May. Of course I forgot to take a picture of the mini Cottage Smalls Carrier because I had already hung it on my basket Christmas tree. I will have to remember to photographic during my next photo session. Hopefully I will be able to get Eric back again as all the baskets we made were just beautiful.
Cottage Carrier
10"(l) x 8"(w) x 9"(h)

10th Anniversary Cottage Mail
11.5"(l) x 5.5"(w) x 6.5"(h)

Cottage Tool Tote
17"(l) x 6.5"(w) x 9.5"(h)
Cottage Towering Tote
 10.5"(l) x 7.5"(w) x 14"(h)
 
This last basket was an extra evening project I worked on. I had really wanted to make this basket so Eric brought a kit for me and let me borrow a mold. I bought one other kit and mold and need to work on that one sometime in the near future when I have some free time (yeah right!).