Saturday, December 18, 2010

2010 Alice Ogden Christmas Ornament


Alice Ogden of West Franklin, NH outdoes herself again this year with another incredibly beautiful basket for my Christmas tree. Measuring only 1" wide x 2" long x 1 3/8" high it is a perfect scale replica of her full size double swing handle basket. Alice has making black ash basket ornaments since 1995 with a new design each year since 1997. I am fortunate to have all of her designs gracing my tree (which I actually leave up all year in my weaving studio).

Alice not only processes all of her splint and hand carves all of her white oak handles and rims she is also a great basket weaving instructor. I made a full size version of this basket back in 2003.

8" l x 5.25" w x 5.75" h

Alice packing one of her full-sized double swing handled baskets.

Monday, November 29, 2010

Pin Cushions

I have been playing with felting more wool lately. I recently made a trip to some thrift stores and bought some old wool sweaters and blazers. The sweaters took about 3 good wash cycles in hot water to get them to fully felt and boy was that crazy. I will have to post more on that later and take before and after photos. It is a sight to behold a man's XXL 100% wool sweater becoming a child's size garment. Of course by the time it is that size it the wool is so thick and dense that a kid wouldn't be able to put his or her arms down!

For the wool blazers I had to cut them apart first before felting. They too shrunk, but the effect wasn't as dramatic since they were just strips of fabric. One of the blazers (the red fabric in the photos) was already made of felted wool so I didn't run it through the washing machine. I used this felt to make pin cushions. I found the pattern on Etsy and decided to give it a try. I am not the best at sewing or decorative stitching, but I thought they turned out fairly well. The later ones definitely turned out better.
They range in size from 2.5" to 4.5" in diameter.


I am excited to try some more. While I have plenty of the three fabrics left I really want to find some more colors. While searching for buttons at my grandmother's I found a few scraps of old wool. I am going to try to felt it (hopefully it isn't too moth eaten) and make a special one out of it including a button from her button box. That one will definitely be a keeper. The other ones I will probably give away as little favor/gifts. I mean, how many pin cushions does one person need? Of course how many baskets does one person need? But, that has stopped me from hording those!

Wednesday, November 10, 2010

St. Louis Post Dispatch - local basket maker feature

This article recently ran in the local news paper. Mary Makuta took that first Shaker basket class here at my house at one of the workshops I host. Since then she has taken almost 20 classes from my guest instructors.

Made in St. Louis: Mary Makuta
BY KAREN DEER
Sunday, October 31, 2010
Mary Makuta from Ballwin displays
some of her basket creations
Wednesday afternoon.
• How did it start? I was taught crochet and hand embroidery when I was 10 years old. By 13, I was designing and sewing my own clothing. Later, I began making my own draperies and becoming acquainted with fiber arts. In 1992, I became a porcelain doll artist. Years later, I created totes and handbags made of natural fibers. In 2004, I was introduced to the lost art of Shaker basketry. I attended a class taught by a well-known artist, Martha Wetherbee, who has devoted her life to preserving the art of Shaker basketry and other American 'signature style" baskets such as the Nantucket lightship basket. During the class, I created a small basket and fell in love with the wood. It's like satin.

• What is a Shaker basket? The basketry originated in the 1700s in New England. Most consumers are familiar with Shaker furniture. It's very valuable. The Shakers of New England made outstanding fine arts such as furniture and baskets. A Shaker basket is made from the black ash tree grown in New England. To create a basket, the tree is cut down, hand-pounded, stripped, split and sanded.

• What are your prices? My Shaker baskets start at $100 for a 5-inch basket, which is made of all wood. I also sell Nantucket baskets. Prices start at $75 for a Nantucket penny basket and up to $750 for a 13-inch Nantucket tote.

• What else do you make? I create a hybrid purse made of ash or it can be made of cane. It's created the same way the Shakers prepared their ash 200 years ago. My hybrid purses start at $275. Some of my purse lids feature learned marquetry, an inlaid wood. They start at $500.

• How long does it take to make one basket? It takes a month because of the carpentry process and the wood finish process. I also design a liner for the basket made of silk or wool.

• Do you teach basketry classes? Yes. I have a workshop in my home, and my students choose an item to work on. I'm there to guide them through the process.

Copyright 2010 www.STLtoday.com. All rights reserved.

Wednesday, October 27, 2010

2010 JoAnn Kelly Catsos Worshop

Wow, I can't believe JoAnn's workshop was already a few weeks ago? October has just flown by and I have been sooooooo bad about updating my blog.

Well I finally got some photos from class up on my JASkets facebook page. If you aren't a fan you should become one. You can keep updated on my day to day activities. It was fun posting pics live from class with my new iPhone. My camera still takes better photos and some are below. JoAnn taught a cute little 1/2 scale Shaker knife basket and a 6" Shaker quadrafoil woven with super fine splints.

Tuesday, October 12, 2010

Recent Works: Aaron Yakin and Cynthia Taylor

September 18 – November 27
Balcony Gallery
The Bascom
P.O. Box 766
Highlands NC 28741

Egg Basket with Side Handles, #98-18
15" x 13" x 6"
Cynthia Taylor
(From my personal collection)

Take a glimpse into the current work of artists from The Bascom collection. Masters of tradition, West Virginia basketmakers Aaron Yakim and Cynthia Taylor make traditional Appalachian white oak baskets straight from the tree.

The Bascom is an arts education center and tourist destination serving audiences in Western North Carolina and beyond with unique cultural experiences. Discover free-admission art exhibitions, plus skills-building studio art classes, curatorial talks and multiple-day festivals. Completed in 2009, The Bascom’s six-building, six-acre campus offers pastoral grounds, panoramic views of the Nantahala National Forest and spectacular architecture, such as an early 1800s covered bridge; vintage-wood pottery barn; and a main building constructed of barns, glass and steel. Amenities include a pet-friendly nature trail, seasonal Cafe and Shop, and limestone terrace for venue rentals.

Kentucky Egg Basket
13" x 9"
Aaron Yakim
(From my personal collection)

Sunday, September 12, 2010

Finishes on Baskets


Below are a couple of responses I posted in Weaver's Words when the question was posted concerning applying finishes to baskets.

Weaver's Words - March 25, 2007
Tung Oil as a stain - Tung oil is a sealant and not a stain. It is going to seal the fibers of your basket and make the weaving rigid. If you are making a Nantucket style basket then this is fine, but for use on a reed, oak, willow, ash basket it is not advisable. You could use it on a wooden handle or base, but I wouldn't use it on the weaving. If you want to darken or color your basket I would suggest using Minwax brand wood stains diluted with mineral spirits or turpentine. [As] most weaving materials are going to absorb stains very quickly, you will get too dark of a color if undiluted. You can also stain your baskets with a number of natural stains like very strong tea or coffee.

Some basket stains may say they contain tung oil, but it is very diluted and if colored must includes some kind of pigment as tung oil itself is basically clear.

Weaver's Words - June 23, 2008 
Lacquer on baskets - Unless you are making a Nantucket basket or traditional raffia stitched coiled pine needle basket I would never apply a lacquer, varnish or polyurethane to the weaving of a basket. If you want to apply a finish to the handle or a solid wood base that is fine, but the weaving needs to be able to breath and flex.
The wood in furniture is also affected by humidity and fine woodworkers take that into account when connecting certain pieces together. Many joints are held together only on three sides to allow for this expansion and contraction. With a woven basket you have hundreds if not thousands of points of contact between thin pieces of wood and each one of those needs to be able to move.
Now concerning dirt and finger prints you are going to get different opinions, but this is what gives antique baskets that wonderful dark color which antique dealers love to call patina. I love when I set a new basket up next to a 10 year old or even 5 year old basket, [with time they] just develop the most beautiful color and the ones that are used and handled often even more so. So, in general for cabinetry and furniture finishes are great, but for baskets (except in a few odd exceptions) they are a no-no.


Sunday, August 29, 2010

Greatest discovery ever!

OK, so that might be a slight exaggeration, but it the greatest stain fighting discovery I have come across in a very long time. You know those little rust colored mildew spots you get on your clothes sometimes? My mother always told me that they come from something wet in the laundry basket (see I was at least able to work one basket reference into this post) laying up against other clothes. Since these very often appear on my sweaty gym clothes I think there must be something to this explanation. Anyway, I was reading on Yahoo News the other day about 101 uses for salt and on the list was how to remove mildew stains. Well I thought it was too good to be true, but thought I had nothing to lose as I was going to have to throw away one of my stained favorite white ringer t-shirts anyway. I had already tried bleach and OxyClean with no success. The article said that all you had to do was wet the spot with lemon juice, add salt and lay out the item in the sun.

Well I was motivated one evening to try this so dug out my t-shirt, plastic lemon from the fridge and the Morton's salt. After two applications of the salt and lemon the stain was significantly lighter and if the spot hadn't be right in the middle of my chest I probably would have worn the shirt as it was. So today I thought I would give it one more shot and follow all the instructions and lay the shirt in the sun. And wouldn't you know it (or maybe not since this was news to me) after about an hour or so in the sun the lemon/salt patch was dry and the spot was completely gone!

I am laundering the shirt as I type this, but when I checked it before putting the load in the dryer the stain had in fact been removed. I am simply amazed. I wish I had all the clothes I have thrown away over the years back. I wish I would have taken before and after photos, but I think I have another shirt to try it on.

• UPDATE •

I just treated another shirt and I took photos this time.

After a couple hours in the sun the salt is dry and the stain is gone. There is a touch of discoloration from the lemon juice, but that will wash right out.

Sunday, August 15, 2010

Peggie Wilcox Class

This year at the Missouri Basketweavers Guild convention, Weaving MO Madness, I was fortunate enough to take a class on the last day with Peggie Wilcox (pictured above). Peggie works with all kinds of natural fibers, many of which she collects and processes herself, including cedar, Siberian iris leaves and madden head fern. While I used to twine quite a bit when I first started basket weaving, I haven't in quite a while and I really hadn't used materials like these.

The cedar uprights were so interesting to work with. They were surprisingly strong and supple. We split the 4" long Siberian iris leaves in two with a needle and used those to do the twining and three-rod wale.

My favorite part of this basket is the star-shaped or "mad weave" start. I will definitely have to try that again on some project.
The finished basket is about 3" in diameter and 1" deep. I didn't do as nice of a job on the rim as I would like to have. It is a bit wavy. I could have pulled it much much tighter as the cedar bark is very strong. The black band around the middle is maidenhead fern (or possibly maidenhair fern).

Sunday, August 1, 2010

Hand Stamped Coasters

I started making these on a whim about three months ago. The first ones were on basic ceramic tiles that I had left over from an old stamping project, then I found some great tumbled marble tiles at a surplus outlet (I bought all they had and of course they have never gotten any more in) and now I am making them on limestone tiles. I really like the new tiles, but unfortunately they cost twice as much as the marble or ceramic so I have had to raise my prices a bit.

I use StazOn solvent-based ink pads so they are water proof and durable. I tried to clean off a mistake and was never able to complete get it off of these tiles even after using paint thinner. I recommend that they only clean them with water though, just to be on the safe side.

I will be offering these, along with a variety of other basketry related items, including my weaving stands, at the Missouri Basketweavers Guild Convention next week, Thursday, August 5 to Saturday, August 7, 2010. On Sunday I am actually taking a class with Peggy Wilcox, so am very excited.

Saturday, July 24, 2010

Westfall Basket

My parents and I have been collecting these Missouri made baskets for 25 years now. They are made by the Westfall family and are on at least their 5th generation of white oak basket making. All of their baskets are constructed using a very unique style of ribbed construction. They use a combination of what they call "long spokes" and "short spokes". If you notice in the photo they do not use a typical Appalachian "ear" or god's eye where sharpened spokes are inserted at the junction of the rim and handle. They use long round spokes that are bound to the frame as the first rows of weaving are began. These oval baskets are relatively easy to find as are the round baskets they made all in different standardized sizes. This 12" x 18" x 14" tall basket would have been called a "1/2 bushel oblong".

Sunday, July 18, 2010

2010 JoAnn Kelly Catsos Worshop

I am very excited to again be able to offer two exciting classes with JoAnn Kelly Catsos of Ashley Falls, MA. JoAnn has won numerous awards for her beautiful black ash baskets and in 1999 she was asked to weave an ornament for the White House Christmas Tree. She also was one of the first to receive the Certificate of Excellence Level I Basketmaking from the Handweavers Guild of America. JoAnn and her husband Steve produce all the weaving materials, hardwood rims and handles, and molds themselves. I hope you can join JoAnn and me for this exciting and fun workshop.

Saturday - Monday, October 16, 17, 18, 2010
9:00 am - 5:00 pm

Half-Size Shaker Knife
4" long x 3" tall
The small Shaker knife basket is a half-size replica of JoAnn’s classic 8" knife basket. This classic Shaker icon will be a great additional to your collection.

Quadrafoil Tub
6" dia. x 2.5" deep
This Shaker quadrafoil tub is based upon an antique Shaker tub at the Shaker Museum in Chatham, NY.  The small stakes (3/32") and even smaller weavers (50/1000" and 1/16"), combined with the quadrafoil twill, makes this a challenging basket (but worth the effort).

Instructor: JoAnn Kelly Catsos
$280

PLEASE NOTE
This is a three day advanced workshop
with quadrafoil twill experience necessary.
Both baskets are included in the workshop.

Contact: Tony Stubblefield
if you would like to receive registration information

Saturday, July 10, 2010

Mystery Basket

 
13.75" dia. x 17.5" tall with handle

Does anyone know anything about this basket? It is one I have had in my collections for quite awhile now, but I know nothing of its origin. I have only ever seen one or two others like it or of the same construction style. It is woven of brow ash, but I am not sure what the rims, handles or base are made of. I have been told that the base is of basswood, but I am not sure if it is like a Nantucket base and had a groove in it for the staves or if it is two pieces of wood sandwiched together with the ribs in between.
It has a distinctive handle and ear attachment with the brass pin going all the way through the ear and side of the basket. The pin or rivet is peened over a washer on the inside. The handle is not really shaped much in profile, it is basically just a heavy split stick with the edges slightly knocked off, top and bottom.
The base has two channels cute a right-angles to accept "ribs" or "splines" that run up the sides of the basket. The ribs are tucked into the weaving and nailed in place. Again the pins go all the way through the body of the basket, but this time are just bent over on the inside. Notice too that the weaving is graduated in size with smaller weavers at the base and wider ones for the top half.

One of these days I am going to try my hand at making a reproduction of this basket in maybe a smaller size. As always, there are too many baskets to make and not enough time.

Sunday, July 4, 2010

2009 JoAnn Kelly Catsos Worshop Photos

Well it only took me a year, but I finally have the photos from last year's workshop with JoAnn Kelly Catsos posted on my website. It is always so much fun to go through the photos and remember all the good times we had. I can't believe that was almost a year ago now. This year's workshop will be in October and I will post details about it in a few weeks. Until then you can relive some of the fun of past year's classes.

Monday, June 28, 2010

Martha Wetherbee Workshop 2010

So how in the world did another year go by so quickly. It just seemed like the 2009 workshop just happened and now this year's has already wrapped. Well even though the class maybe over the memories and the baskets will live on in our hearts for years and years to come. Everyone made beautiful baskets, ranging in size from less than 2" in diameter to over 19"! The baskets I made this year were on the smaller end of the scale, ranging from 4" to 6".
One of the more interesting baskets that I made this year was a small Bushwhacker friendship basket. I have a couple full-sized antique versions in my collection and Martha challenged me to figure out how to make one. She had always wanted to make one, but as so often is the case just never set aside the time to do it. So, we figured out what materials we should use and off I went with my antique basket to reproduce something that was woven almost 100 years ago. The hardest part was making the rims since we didn't have any the appropriate size. I happened to have some white oak which I was able to steam, bend and shape into something that looked pretty much like the original. Both Martha and I were happy with the way it turned out and she is now excited and motivated to someday add this basket to her teaching schedule.
Just 365 days until the next workshop...

Saturday, June 19, 2010

Kittenhead Felted Wool Pin Cushions

1" to 2.5" dia. brown ash kittenhead baskets with sawtooth edge and felted wool pin cushion

A friend of mine got me into wet felting awhile back. She was making beads for bracelets and necklaces and they turned out really well. I thought it was such a cool technique, but I really didn't know what I was going to do with it though. Then I made a 2.5" kittenhead basket with a sawtooth rim and new I had found the perfect use for new found craft.

I have ended up using a combination of needle and wet felting to make these pin cushions. After making a core of plain wool I then add a layer of space dyed wool which I tack down with a felting needle. This makes the wet felting step a bit easier as I don't have to worry about my final layer shifting around on me too much. Of course judging the final size is a bit of a trick as the volume of wool reduces dramatically as it felts together.

Friday, June 4, 2010

Another New Shelf

I have had this shelf for awhile now and am finally getting it up. I was also able to get some baskets out of storage that I hadn't been able to display for lack of space. These are more of my collection of strawberry baskets and other Native American curlicue baskets. The are all woven of brown ash with sweetgrass accents and a few include some braided Hong Kong grass.

For once though it would be nice to put up some shelves and have some space left over to grow...

Tuesday, May 25, 2010

John C. Campbell Folk School, 2010

If you have never gone to the John C. Campbell Folk School then go sign up for a class today! You will not be disappointed. This was my fourth time to the folk school and I am already looking forward to next year. My class was taught by JoAnn and Steve Catsos, black ash masters. JoAnn and Steve make all of their own molds, handles, rims and splints, but this time we got our turn to make our own materials (at least partially) ourselves.
This one one of the many beautiful views I had on my drive through Tennessee
From St. Louis you end up drive along the Ocoee river, which in the warm month is flowing with rapids. The road is a bit winding, but as long as it is light out and not icy it is a fun drive.
I usually choose the dorm room option as it is the most economical and it saves more money to buy things! It is also nice as you get a chance to meet some of the many other like minded crafts people. There are all levels of accommodations at the Folk School, from the rustic (like the dorm room above in the Keith House) to the brand new posh single and double rooms.
These are some of the basic tools we used to process the black ash log into splints for weaving.
Steve gets us started by splitting the log in half with wedges. The log is then halved again into quarters, then split into billets which we then set to work on with the draw knife and the mallets.
Since the log was just cut a week or so before class the sap was still rising so JoAnn and Steve were able to peel the bark off in one big sheet. We were then able to play around and fold it into buckets to be stitched with elm bark. I had never tried anything like that before and it was so cool. I thought it was wild to just be able to bend the bark like it was a big sheet of paper, but the stitching with elm bark was even better. The elm was like working with leather lacing, it was so strong and flexible I couldn't believe it.
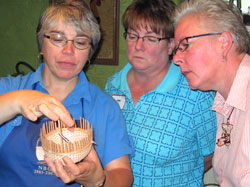
After a quick pounding demonstration, which Steve made look much easier than it was, he demonstrated splitting the single growth ring in half to reveal the beautiful satin surface. Here Steve is using a splint chute to help with the splitting.
Here is my billet all ready for me to start pounding, but before I could do that I had to clean up the edges a bit on the shaving horse with a draw knife.
And so the pounding begins and continues and continues. While it did take hundreds of hits it was so rewarding as the rings began to separate and fortunately every layer was that much easier to peel apart.
Here is my pile of splints. They were thick enough I could have easily split them to satin and maybe even a few to double satin, but for the basket I was making I needed extra heavy splints so I left them as they were.
The scraping actually was more work than the pounding as you had to measure the thickness along the length of the splint with a micrometer to make sure it was consistent from end to end and was consistent from piece to piece.
After the splints were scraped to the desirable thickness it was time to cut them into weavers and uprights. Here Steve demonstrates using a bank of knives to cut multiple weavers from a single length of splint.
The grounds of the Folk School are so picturesque. In a small tree right next to the front porch of the cafeteria was a next of baby robins. We checked on them everyday at every meal, you just couldn't help it.
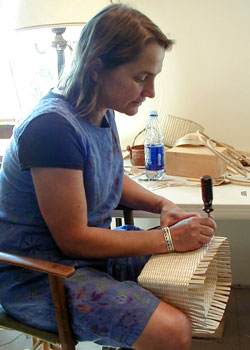
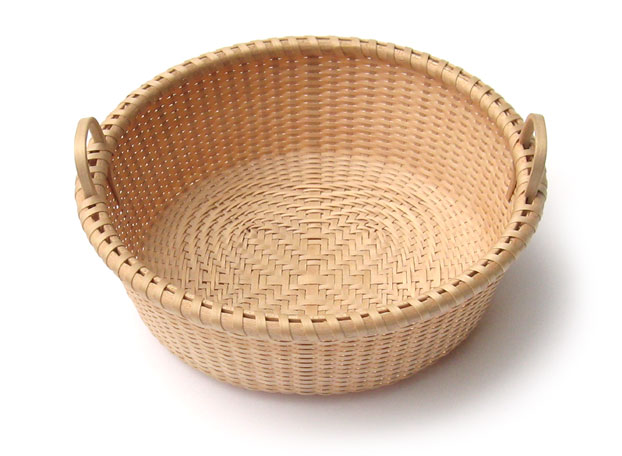
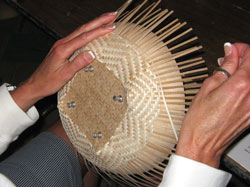
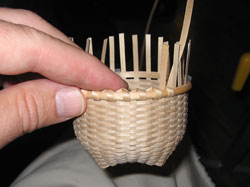
After all the prep work the actual weaving of the basket went pretty quickly. I brought my own mold so made the handle and rims ahead of time. This was a "bump bottom" puzzle mold that I have had for a while, but had never woven on. It is about 10" in diameter and the largest in a nesting set of 4.
Here is the happy class with our completed baskets. Most people were able to finish at least a couple baskets during the week and went home with a nice stash of splint.
One of the cool things they do at the Folk School is to have a show on the last day so can see all the work that has been done in the various classes. These are the three baskets and the bark "bucket" I made. Normally they give you little slips of paper to write your name on, but Steve thought those were too pedestrian so he made us each a brown ash tag in a white ash hold. Now how cute is that?
Linda and her Mt. Lebanon carrier, lidded knife and mini black ash bark bucket.
Joanne and her Mt. Lebanon carrier and big black ash bark bucket.
This is what the inside of my basket looks like. It has a double bottom, kicked up in the middle. You can't see it in the photo, but there is the traditional Bushwhacker "knot" in the bottom.
Here are some of the incredibly intricate turnings that were done in the wood turning class. Yes, those are real sea urchins used to make the Christmas tree ornaments.
These chairs were made in the wood working class in the studio next to ours. The one in the center was the instructor's sample. The students in the class did and incredible job which they should be very proud of.
If this final image doesn't convince you of the splendor of the John C. Campbell Folk School then nothing will. Can you just imagine waking up to that every morning? At least I got to do it for a week.