Showing posts with label Tips and Tricks. Show all posts

Friday, August 31, 2018

My new light setup


via Instagram https://ift.tt/2PVV3Yi

Here's my new light setup. I purchased this continuous light kit over a year ago and am just now finally setting up.

I decided to change out the white umbrellas that came with the kit for a black with reflective lining version. I purchased both the light kits and the black umbrellas on Amazon and while the bulbs seems to be full-spectrum, they aren't very bright at all. The original white umbrellas didn't reflect nearly enough of the already dim light, which necessitated the black/reflective set.

The lights setup to reflect off of the background I made myself and the instructions can be found here.

Monday, July 23, 2018

How do you sign your baskets?


via Instagram https://ift.tt/2zZTXH3

How do you sign your baskets or do you even sign them? I must admit I have not always been the best at doing it myself. The signing isn't as big of a deal as dating them. I have so many early baskets that at the time I just knew I would always know when they were made. Well, flash forward 25-30 years and I don't have a clue. I can usually come up with a date if I look through old photos or files I have from basket workshops or trips, but it would just be so much easier if I had just signed and dated them in the first place.

For my reed baskets I typically use a wood burner and scribe my initials and the dates somewhere around the handle or in the case of a ribbed basket, on the "ear". For Nantucket-style baskets I usually sign them on the base using a gold paint pen which works pretty well and shows up on cherry bases nicely. For my pounded ash baskets I usually sign them with a Micro Pen, either in black or ideally brown. Some of these baskets are miniatures or use really fine splint, so I need something fairly fine to be able to sign them. Typically these I sign and date on the bottom in the center of the woven base.

Do you have a special way you like to use?

Wednesday, June 14, 2017

Mold Weaving Woes

Nantucket and Shaker basket weaving stand
via Instagram http://ift.tt/2rZVLdc

I don't know how people weave on a mold in their lap. I always use an adjustable weaving stand when making a Nantucket basket or any other mold woven basket. Originally I just used a table top version that would clamp to the end of a table. At a basket weaving workshop in North Carolina I was introduced to a floor stand version and immediately fell in love. I used that stand for years and referred many people to the man that made them. One day though the gentleman fell off the face of the earth never to be heard from again. For years after that people always asked me about my stand and where they could get one. Finally I decided I need to make my own version to sell and a small cottage industry was born. I have made, sold and shipped hundreds of these crazy things over the intervening years. I never go to a workshop without mine, it is indispensable. Because it adjusts to any height I can even stand while I weave if I need to give my back a stretch.

Sunday, March 26, 2017

Hoarder vs. Mad Genius


via Instagram http://ift.tt/2nkaxY5

Some call me a hoarder or a pack rat, but I call it genius. I used the scraps of leather I couldn't bring myself to throw away to make washers for a waxed canvas tote.

Friday, August 19, 2016

Flash Back Friday


via Instagram http://ift.tt/2bp4kn4

A little flash back Friday to me actually finishing one of the baskets I started at the Missouri Basketweavers Annual Convention. Basket body woven and rimmed, now to mark where the handle will go with my handy Handle Minder. Because I had first used the Handle Minder to mark the base for the position of the first two staves, it was easy to line back up the two perfectly opposite staves and mark the rim for the handle holes.

Sunday, July 17, 2016

Baskets baskets everywhere


via Instagram http://ift.tt/29H9Sba

So needless to say, but I have a lot of baskets around my house ...

Also, probably needless to say, I am a tad anal retentive ...

So I typically like to display and arrange things in a very logical and organized fashion. That doesn't mean I have to line things up in a perfectly straight line, but items are definitely placed with thought behind them, even in groupings. Anyway after visiting another basket maker who puts my collection to shame, I decided to get out of my comfort zone and to try arranging things more organically. Here's my attempt. Probably still more thought out than most, but a big step for me.

Enjoy.

Sunday, October 25, 2015

Display Table

I am always trying to come up with creative ways to display my baskets. I have so many that they literally are in every room and every corner of the house. One of the hardest style/shape of basket is the tray or shallow bowl. Fortunately my father makes and sells a glass topped display table. It is basically a coffee table with a big shallow drawer, but the top is glass, so you can see whatever is in the drawer. This works perfectly to display my many Native American baskets, pine needle trays and other shallow baskets.
I must apologize for the crappy pic, but with the glass it was challenging to photograph.

Sunday, August 30, 2015

Old Tech Meets New Tech


Does anyone else do this? Do you take pics with your phone so that you can remember things? I now take pictures to remind me of gifts I want to give or get, flyers of events I want to go to, and steps of processes I am afraid I am going to forget.

So when it came time to change the thread color on my rarely-used vintage sewing machine I FINALLY stopped to take a picture first so I would know how to re-thread the damn thing. Ever other time I would look at the path and think, "OK, this is simple I can do it again," only to have absolutely no recollection of all the dips and doodles. Of course, now that I have actually taken the reference photo I will probably be able to remember now, but at least I have it, when 6 months from now I need to do this all over again.

Wednesday, August 19, 2015

Pinterest Ideas


If you are like me, you like looking at all of the great ideas on Pinterest. Unfortunately many times it seems like the projects are completely impractical or worst, aren't even projects at all and just links to Google images so there are no instructions or any additional information.

This idea of using a restaurant style cheese shaker (or sugar dispenser) as a twine holder was actually one that needed no further instructions to make. I like using butcher's twine in my card making or for making tags, but between the cat going absolutely bonkers and the spool shooting across the table, I find it can be a test of one's patience. I had been on the lookout for one of these vintage restaurant wares for the last year, but had never run across one. I hit the jackpot earlier this summer when I found not only this cheese shaker, but also a sugar dispenser as well. Both looked like they had never even been used before.

While my big cone of red and while baker's twine won't fit (until I use up more of it), my other spools fit perfectly and keep the spool on the table and away from playful kittens. It made sitting in front of the TV tying strings to tags a pretty easy task. It also doesn't hurt that they look cool hold the twine too.

Sunday, August 31, 2014

Having Fun Building Stuff

So in a strange twist I had two relatively free weekends recently. That just doesn't seem to happen very often anymore. I especially don't seem to have time to weave or, what is probably more accurate to say, I don't set aside time for basket making.

On the first of my free weekends I made a cute little basket from a kit I purchased from Gail Hutchinson at the Missouri Basketweavers Guild Convention a few weeks ago.
The basket is woven of American elm and walnut with white oak swing-handle and rims. Gail calls this her All American Berry Basket and it is about 5.5" x 7.5". Nearly every basket I have made over the last 20 year has been woven over a mold, so free weaving this basket was a change of pace for me.

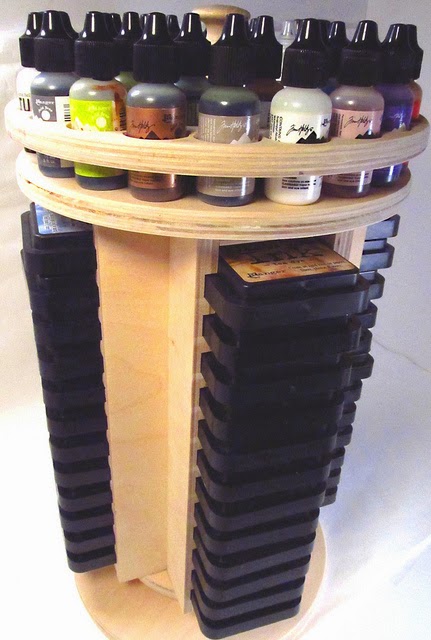
So a couple of years ago I was reading the blog of Jim the Gentleman Crafter and saw this cool ink storage unit. It is one is designed to hold Tim Holtz Distress Ink pads and Adirondack Alcohol Ink bottles. At the time I was just starting to use Distress Ink, so didn't have that many colors, but still thought this was a pretty swift storage option.

As I added to my stash of ink pads I tried a number of different storage options, but all required lots of digging to find the color I needed. So, after getting a new router table awhile back I finally decided to try my hand at making my own. Now this was completely on a whim. I really hadn't planned on getting up and making this, so I was just working with scrap plywood, poplar, pine and maple I had on hand.

I wish I would have taken some step-by-step pics, but I was in the zone and kind of adding pieces without a real plan. I just knew that I wanted it to hold 48 Distress Ink pads, anything else was just a bonus.
Here it is after the first day of work. I figured I would sleep on it and mull over what I wanted to do next.

The next morning I had a bit more of a mental plan of where I wanted to go next. I didn't have a lazy Susan spinner part, so would have to make a run to Home Depot for that. I decided that I would use spray paint to prime and at least give it a first coat of black paint. Typically I would use black acrylic paint for a wood project like this, but there were just so many nooks and crannies that the thought of brushing the whole thing was daunting.

The black spray paint I picked up at Home Depot, even though it was supposed to be semi-gloss, was really shiny. Even so, it covered well, so I wasn't going to need to give it a coat of acrylic. I knew I wanted to distress the piece, so was going to sand through some of paint along the edges, but with the way the paint looked I was going to have to sand every square inch. Ugh.

I have been collecting old yard sticks for awhile now for some future project and this seemed like the perfect place to use them. A lot of the yard sticks are advertising items, so have cool writing on them. I was a bit nervous about cutting them up so measured and hand cut each section as I went.

Here is the "final" assembly, painted, sanded and waxed (I may add more stuff at some point).

As I said, I was just adding pieces as I built it, so I didn't plan any of the extra spaces to hold anything specific. The only thing I knew from the beginning was that it needed to hold the 48 colors of Distress Ink pads. If I had known what I know now I would have made the top and corner spaces a hair bigger, then four reinkers would have fit in each corner cubby and six stacks of Archival pads instead of four would have fit on the top deck.

I was so pleased with how the spinner turned out that I was already thinking about how I could make one of these for a couple of my stampin' buddies. I posted a picture on Instagram and Facebook and had a nice response. Then my friend, Jim Hankins (The Gentleman Crafter), shared it on his own Facebook page and the interest exploded. I need to make another prototype with the revisions I want to incorporate and figure out how much the raw materials will cost.

Hopefully I will be able to offer them to others. Now just to find some more of that elusive free time ...

Sunday, April 28, 2013

Working and Stamping

So the last six months have been so crazy with work and more work. I have had little time to craft (or blog). Well, at least a few things have slowed down a bit so I have finally had some time to get back into my mess of a craft room and actually work on some fun projects.

Here is my display from the Stateline Friends Weaving Retreat where I introduced the new stamp designs.

As some of you may know, I have been producing my own line of rubber stamps. I started with a few sheets of stamps and after using them myself for a few years I decided to start offering some of them for sale. A year ago I introduced four sets of baskets with accompanying words/sayings. This year I added two more sets. I barely had time to get the new sets made let alone use them, until recently. Even though I haven't had any time to craft that hasn't stopped me from buying more stamps, paper and inks.

I never do anything small. When I buy paper, I buy a lot...


I love the new sets of Darcie's and Tim Holtz stamps I picked up. I think they go so well with my basket stamps. Here are two of the cards I made using the new stamps.


While I keep one sample of the cards I make and I usually photograph them to put on Facebook I have never tried taking photos of process, until now.*


 I started out stamping a large background image in Ranger Distress Ink, Vintage Velvet on a piece of cream colored card stock.

I then added a strip of butterflies and moths along one side using Dusty Concord.

 Here is the panel with both images.

To add a little more interest to the background I added a strip of texture in a contrasting color.

 Next I used a blending tool and some more Vintage Velvet to edge the cream colored panel.

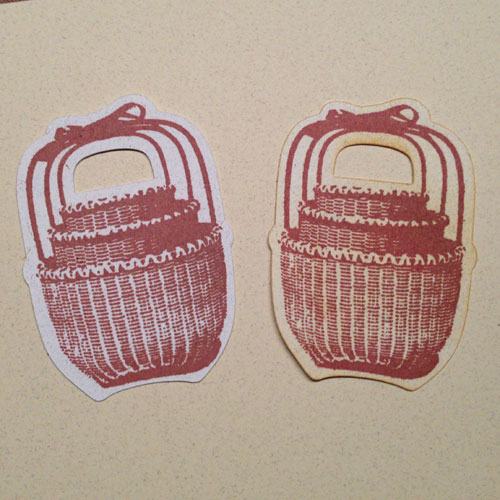
I had stamped and cut these shapes using my Sizzix eClips cutting machine for another project and had a bunch of them left over. They were on a whitish card stock, but I thought if I edged them with the Vintage Velvet they would look fine on the card.

Unfortunately they didn't look like I wanted them to, so I used some Scattered Straw colored Distress Ink and a blending tool to tint the white paper to better match the cream colored background this was going to be layered on.

Since I already had the shape of the basket stamp drawn using Adobe Illustrator and brought into the eCal software that came with my eClips machine I was easily able to cut a sheet of shadows out of purple card stock.

To assemble the cards I layered the stamped pane (I added "Shaker" to the lower left-hand corner) onto a purple fold-over.

To add a bit more dimension to the card I used a square of foam tape to raise the basket off of the surface of the card.

I usually make a few modifications after I make the first design. Here you can see how the baskets on the white paper stood out in too much contrast for my taste. I also initially stamped the word "Shaker" in the same purple as the butterflies, but I wanted to add some more brown into the card. When I make cards I always make a bunch at the same time. Once I have all my elements cut and my design figured out, it is just as easy to make a stack as it is to make one.

*Sorry if all of the photos are not the sharpest, I took all of these just with my iPhone.

Sunday, February 26, 2012

Glass Domes

Three waxed linen baskets displayed under glass domes.
I love glass domes. They just seem to make anything you put under them look special. I have ones in all different sizes that I have picked up over the years. Usually the ones you find are round and probably had a clock under them at one time, but on the rare occasion you can find an oval, those are usually the old ones. Most of the domes I have are without a base. While that isn't necessary to use them, it does look nice and it makes it much easier to move them and the object inside. Now that I have my new wood lathe I have all the best intentions in the world to turn some myself. So far that hasn't happened, but I still have that on my "to-do" list. Another benefit of the glass domes is that they protect your objects from dust. Since my knotted baskets, like the ones in the photo, are made of waxed linen they do attract dust (an curious kitties) more than a splint basket which can just be dusted off. I need to find a really tall one for the last knotted basket I finished, though they seem to get exponentially more expensive as the size increases. I will keep looking though.

Saturday, February 4, 2012

New Lighting Setup

So, I finally decided to make a new lighting setup for taking my basket photos. The old system I had built worked great, but it was really big and cumbersome. When it was setup it was great to use, but when it had to be taken down and stored I never wanted to get it back out again just to shoot a quick photo. So, as they say, necessity is the mother of invention so I scoured the internet and found a couple different tabletop setups that I liked. I would have loved to have bought a set of  Lowel Ego lights, but at about $300 for a set of two, that was more than I wanted to spend. So, off I went to Home Depot with a shopping list and a rough plan in my head.

Home Depot list:
  1. (two) 2'x2' replacement covers for florescent ceiling lights (actual measurements 21.5"x21.5")
  2. (four) 100W CFL full spectrum bulbs
  3. (two) clamp shop lights
  4. (two) Y-connector sockets
 
 Stuff I had around the house:
  1. scrap foamboard (14"x21.5" x 2)
  2. (eight) short drywall screws
  3. (eight) short sheet metal screws (gutter screws)
  4. (eight) washers
  5. vellum (heavy weight tracing paper)
  6. packing tape and scotch tape
  7. scrap wood
  8. silver bubble wrap
Tools:
  1. drill
  2. x-acto knife
I started out by cutting two scrap pieces of wood 14" long. I pre-drilled holes, large than my sheet metal screws, in the corners of my florescent light covers and drilled matching smaller holes in the ends of my wood stretchers. I attached the stretchers to the plastic covers (prism side down) using screws and washers (to help the plastic not crack). The plastic was fairly flexible so the gentle curve was not hard to achieve.

I removed the reflectors and clamps off the lights as all I wanted was the socket, switch and cord. I measured a backing piece of foamboard (14"x21.5"), found the center and traced the outline of the light socket. I then carefully cut out a hole for the socked to slip into (cut right on the line or a bit inside so that the end of the socket fits snugly).

Being the pack rat that I am I had some shiny bubble wrap/insulation cubbied away from a delivery of frozen food. I cut this to match the foamboard backing and cut a hole in it as well for the light socket. I added this to help reflect forward as much light as possible. The plain white foamboard probably would have been fine, but since I had the silver stuff I figured I might as well put it to use.

Grayson inspects my work.
I used short dry wall screws to attach the layer of bubble wrap and foamboard to the back of my diffuser. The light socket fit in snuggly without the need to secure it. With the Y-connector and light bulbs installed it can't come out anyway. There was a bow in the plastic along the sides that I was afraid would put pressure on the four corner screws.

To relieve the pressure on the corners I eliminated the bow by using clear packing tape to squeeze the sides in against the foamboard backing.

I then taped a layer of vellum to the outside of the plastic diffuser to soften the light. I didn't have a sheet large enough to cover the entire surface so I butted up four pieces and taped them together with scotch tape. Fortunately there was plenty of static electricity in the plastic cover so the vellum stuck down smoothly making it easy to tape.

To finish the light I installed the socket, Y-connector and two compact florescent bulbs. I then repeated the whole process to make my second light.

I use a large piece of white paper as a backdrop, but color would work. Since this is setup in my basement I have two clips suspended from the ceiling so that I can clip the top edge of the backdrop. The key is to have a smooth continuous background without any angles or seams and to have enough backdrop that it is away from your work. Fabric can work, but I prefer all the wrinkles and drapes be smoothed away as to not distract from the basket or object you are photographing. I also balanced a large piece of white foamboard across the top to reflect some of the light down. Since I am using compact florescent lights there really isn't an issue with heat like there in with standard incandescent bulbs.

While I had the room lights on to take this photo of the whole setup, I normally photography my work in a darkened room to eliminate any stray light or shadows.

Here is the resulting photo from my new setup. The lighting is nice and balance and the shadows are soft. Of course you can play around with positioning the lights and/or objects to change the lighting, and you can even try just turning on one of the lights, but you might need a piece of white board or some kind of reflector to bounce some light back onto the object.

So for about $30 I was able to make two lights that would have cost $300.

Sunday, January 29, 2012

Photo Setup

So I was getting tired of my very large and cumbersome photo lighting setup so I built something more compact. I will post a more complete description in upcoming posts.

My old setup.
My new table-top version.

Friday, January 20, 2012

Felting

I have been meaning to post these photos forever, but keep forgetting. As followers of my blog and facebook page know, I have been playing around with felting 100% wool blazers and sweaters to use in craft projects, such as felt wreaths, felt phone caddies, and pin cushions. When I felt the blazers I completely rip all the seams apart so that I am washing pieces of fabric. I can tell that the pieces shrink during the process, but it is hard to tell exactly how dramatic the size change is. Sweaters on the other hand I felt intact and then cut apart. Depending on the type of wool and how heavy the sweater is will affect how much they are going to shrink up. Sometime the change is huge and literally makes me laugh when I pull out a men's XL and it now looks like a child's sweater.

Here are some before and after photos to give you an idea.

Man's XL 100% wool sweater.

After washing the sweater in hot water through three cycles.

The dramatic change in size once the felting process occurs.
Edit

NOTE: I just want to warn you that felting in your washing machine is not supposed to be the greatest for the filter. It produces a huge amount of lint. If you can clean it out of the washing machine drum before it going through the rinse cycle and filter that would be better. If you run these in your dryer be sure to check the lint filter often on that too. You will completely fill it in no time. You can save this to use as stuffing too if you want. I stuffed a couple of pin cushions with it, but then got tired of collecting it.

Wednesday, August 10, 2011

I wanna take another class!

My set of Shaker boxes from John Wilson worshop

I haven't gotten to take a class in a while and I am itching to do one. While I still learn something new in any class that I take, the real benefit for me is getting away from the phone, the internet, the laundry and all the other distractions of modern life.

I ran across these videos today and oh how do I want to make a new set of Shaker Boxes. John Wilson is the gentleman I took a class from this past winter. It was a great class and so much fun. My nesting set of five boxes are aging nicely. The cherry wood is already getting so dark. You can really notice the change when you take the lids off and see the original color of the wood around the top of the box where the lid has shielded the wood from the light. Right now I have the boxes lined up in a row on the window sill facing the opposite direction to give them a sun tan on their fronts that have been facing into the room.

If you are curious on seeing how boxes are made here are a couple of videos that pretty much show you the whole process. This gentleman does a few things a bit differently than Mr. Wilson, but the overall process is the same as the way I learned.


So, if you ever get a chance to take a class, be it a Shaker box workshop or just a make-it-and-take it card class at your local craft shop, do it! Even if you don't learn something new, though I bet you will, at least it will get your mind and your hands working.

Sunday, September 12, 2010

Finishes on Baskets


Below are a couple of responses I posted in Weaver's Words when the question was posted concerning applying finishes to baskets.

Weaver's Words - March 25, 2007
Tung Oil as a stain - Tung oil is a sealant and not a stain. It is going to seal the fibers of your basket and make the weaving rigid. If you are making a Nantucket style basket then this is fine, but for use on a reed, oak, willow, ash basket it is not advisable. You could use it on a wooden handle or base, but I wouldn't use it on the weaving. If you want to darken or color your basket I would suggest using Minwax brand wood stains diluted with mineral spirits or turpentine. [As] most weaving materials are going to absorb stains very quickly, you will get too dark of a color if undiluted. You can also stain your baskets with a number of natural stains like very strong tea or coffee.

Some basket stains may say they contain tung oil, but it is very diluted and if colored must includes some kind of pigment as tung oil itself is basically clear.

Weaver's Words - June 23, 2008 
Lacquer on baskets - Unless you are making a Nantucket basket or traditional raffia stitched coiled pine needle basket I would never apply a lacquer, varnish or polyurethane to the weaving of a basket. If you want to apply a finish to the handle or a solid wood base that is fine, but the weaving needs to be able to breath and flex.
The wood in furniture is also affected by humidity and fine woodworkers take that into account when connecting certain pieces together. Many joints are held together only on three sides to allow for this expansion and contraction. With a woven basket you have hundreds if not thousands of points of contact between thin pieces of wood and each one of those needs to be able to move.
Now concerning dirt and finger prints you are going to get different opinions, but this is what gives antique baskets that wonderful dark color which antique dealers love to call patina. I love when I set a new basket up next to a 10 year old or even 5 year old basket, [with time they] just develop the most beautiful color and the ones that are used and handled often even more so. So, in general for cabinetry and furniture finishes are great, but for baskets (except in a few odd exceptions) they are a no-no.


Friday, June 4, 2010

Another New Shelf

I have had this shelf for awhile now and am finally getting it up. I was also able to get some baskets out of storage that I hadn't been able to display for lack of space. These are more of my collection of strawberry baskets and other Native American curlicue baskets. The are all woven of brown ash with sweetgrass accents and a few include some braided Hong Kong grass.

For once though it would be nice to put up some shelves and have some space left over to grow...

Sunday, March 7, 2010

Tips for saving your finger nails

I swear by a product called "Nail Envy" by OPI. It is a nail polish that is clear and super strong. According to the instructions, you are to put two coats on the first time and then one additional coat each day for a week. From experience though, after having your hands in water, etc., that many coats ends up looking pretty crappie and yellowed. I usually do the first double coat two days before class and then one coat the day before. If I need to touch up any chips I just reapply as needed. I usually only have to add more coats on my index and middle fingers as those are the ones that do the work and take the beating. If you are taking a full week of class I have about half-way though wiped my nails with polish remover which smoothes the Nail Envy and makes your nails look presentable again,. You can then add a fresh coat once the smoothed polish dries. Ever since I started using this stuff I have not had any sever problems with my nails breaking or chipping. You still might get a little chip here or there, but if you apply the Nail Envy it will keep it from getting progressively worse. Of course as a male I get funny looks when I go into the beauty supply store and ask where the nail polish is. They make a "matte" finish and it does look very natural, but as soon as you touch it is shiny, so I don't know why they even bother. I used to try to clean it all off after the class is over, but it is so tough that it takes forever to get it all off with acetone, so now, since it is clear anyway I just let it wear off.

Sunday, January 31, 2010

Follow my JASkets blog

Did you know you can "follow" my blog? It is easy to do and is great for keeping up with any new postings on your favorite Blogger members.

Here is all you have to do:

First click on the "Follow" link on the right side of the screen. Sign into your Google, Twitter, Yahoo! or a number of other accounts. You will then be asked how you'd like to follow the blog (either public or private), and then finish up by clicking the "Follow this blog" button. It is that simple, you are now a follower of my blog! If you elected to follow the blog publicly, your profile picture will be displayed on the blog with a link to your Blogger profile. When you become a follower, the blog will also be added to your Reading List on your Blogger dashboard. Additionally, you can become a follower of any blog or URL (even if the blog doesn't have the Followers widget) by adding the blog to your Reading List on the dashboard.

I use my reading list on my Blogger dashboard daily to see who has posted something new. While everyone I follow doesn't publish something everyday there is usually at least one new post to read.

So, "follow me" today!