 |
| Right click on a PC or control click on a Mac to gianormasize. |

Monday, December 31, 2012
My 2012 Christmas Tree
Saturday, December 22, 2012
2012 Alice Ogden Christmas Ornament

Sunday, December 16, 2012
2012 Christmas Card

Saturday, December 15, 2012
Ah, the rush of the holiday season
 |
| 2012 Christmas card parts stamped, cutout and partially inked. |
I always have high hopes of taking step-by-step photos of my card making, but I usually get wrapped up in the process and forget after the first couple of steps. The photo above is of all the Santas stamped images cutout with my eClips machine. I used permanent Archival black ink to stamp the Tim Holtz Santa image, inked the edges with Distress inks and a blending tool, then gave them a good spritz with biscotti colored Perfect Pearls for some shimmer.
I promise to take a photo of the completed card so you can see how they turned out.
Wednesday, November 14, 2012
Wish I was weaving Wednesday
 |
| JoAnn Kelly Catsos poses with me and the two baskets I made in the workshop I hosted for her |
Oh how I wish I was weaving on this Wednesday (well every day actually) instead of having to go to work. I can't believe that my workshop with JoAnn Kelly Catsos was almost a month ago already. That is the last chance I have had to weave. With the holiday season rapidly approaching I doubt I will have much time for any more either. My next big project is making my Christmas cards. At least I have them designed and started. I really really need to work on getting all the pieces made so that I can take them home to my parents over Thanksgiving so I can sit and assemble while sitting in front of the fireplace.
Tuesday, October 30, 2012

Monday, October 8, 2012
Cherry and Ash Potbelly Basket
 |
| 4" dia. x 5.5" tall |
Wednesday, October 3, 2012
New Addition to My Collection of Contemporary Baskets
 |
| Leon Niehues, Arkansas - 2012 8" x 6.75" |
Leon's baskets are made of white oak, processed in the traditional Ozark method of using a draw knife to pull splints off of a billet. He accents his baskets with overlays of ribs stitched with waxed linen, coral berry bush runners and machine screws.
Friday, August 24, 2012
How time flies when you are having fun
 |
| 10" diameter ribbed basket - reed |
Anyway, back to reality. When I first started weaving my favorite type to make were ribbed baskets. This one was made after I took a week long workshop with Estel and Gertie Youngblood at the Appalachian Center for Crafts. The reason I know this is that I have starting "filling in" the traditional Appalachian method the Youngbloods taught me. Though it doesn't use the "ear" that we used in class. I know I used to switch between two different traditional styles.
 |
| 10" diameter ribbed basket - hand split white oak |
The crazy thing is that as much as I have always loved this style of basket I have not made a ribbed basket in probably a dozen years. I used to teach a lot of ribbed basket classes, but when I stopped teaching those back in the late 90s I quit making them completely. I really want to take another white oak class and hopefully will get to one of these years.
Sunday, August 19, 2012
What I've Been Up To

Wow, has the end of summer been crazy busy or what? Not only did I host a fabulous class with Eric Taylor at the end of July (you can see some photos from the workshop here), but also immediately following was the Basketweavers Guild of Missouri's annual convention where I was a vendor and Vendor Chair.
Fortunately as busy as I was, I was able actually get some baskets woven and more importantly finished! Here are those baskets.
 |
| Cottage Handbag |
 |
| Cottage Jewelry |
 |
| Cottage Dresser Tote |
 |
| Cottage Wine Tote "Smalls" |
 |
| Full-sized Cottage Triple Diamond Wine Tote and its little cousin |
Sometimes it is hard to tell the actual size of a well made miniature in a photograph. Eric Taylor's are so well proportioned that you simply can't get a sense of scale until you compare one of the baskets from his "smalls" collection to the full-size counterpart. Here the Smalls Wine Tote is paired with the first ever Eric Taylor basket I wove, the Cottage Triple Diamond Wine Tote. I would love to make another of the miniature version and repeat the diamond twill pattern in it.
 |
| Cottage Business Card |
I wasn't vending on Sunday, the last day of the MBG convention, so I decided to take Eric Taylor's Cottage Business Card class. It was so nice to just be taking a class and relax and weave. What a cute little basket, fun to weave and fast to complete. I can't wait to put it to use.
 |
| Shaker Bureau Basket |
Friday, July 13, 2012
Ben Higgins Basket - 2

While Higgins baskets are easy to find, they are often not recognized by the owner/seller. My father had purchased this basket in Massachusetts, neither he nor the antique dealer he bought it from knew what they had.


Wednesday, June 20, 2012
Square Bushwhaker Basket
 |
| 13" diam. x 6.5" high without handle |
 |
| 9" x 9" base |
 |
| Swing handle ear detail |
 |
| Rim detail |
Another signature style of a Bushwhacker are the heavy rims. The rims are usually made of white oak, but will almost exclusively be double lashed with black ash.
Thursday, May 17, 2012
Tableau

Since I have had a chance to blog in awhile I thought I would at least put up a pretty picture (at least I think it is pretty). This is one of my favorite baskets (I wrote about it a few years ago). You may think I sat it in the tiger maple Shaker-style chair to simply create a little tableau, but it actually serves a valuable service. It keeps the kitties from laying on the newly woven Shaker tape seat.
Wednesday, May 2, 2012
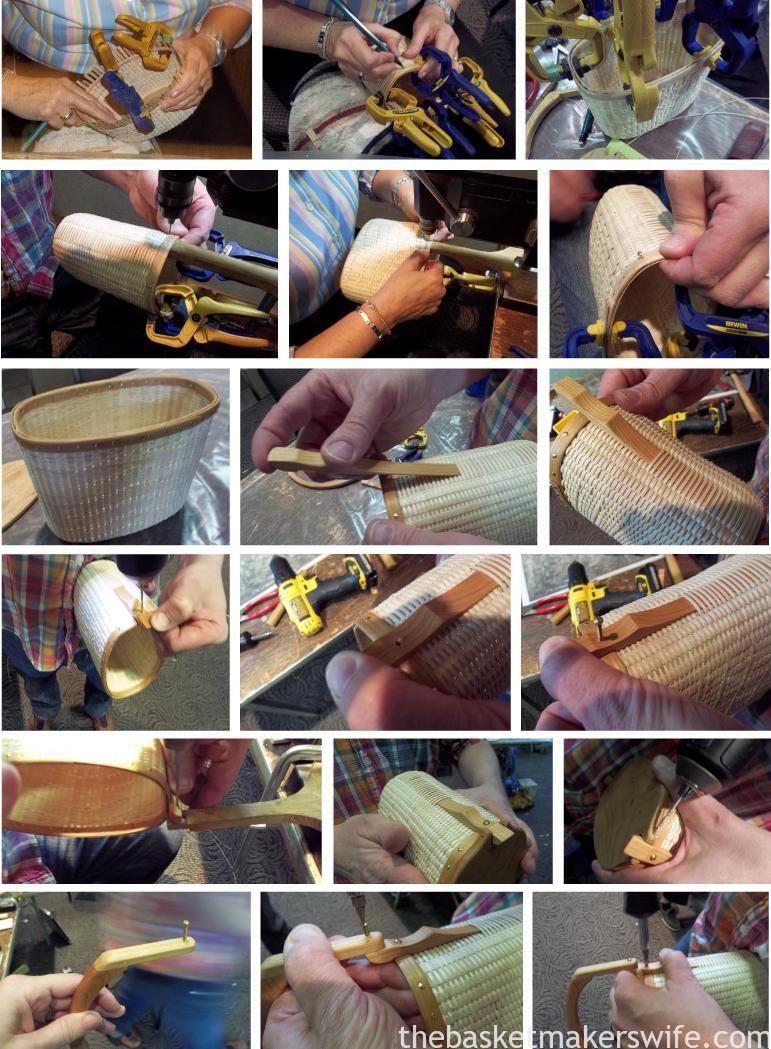
Eric Taylor's Cottage Purse
This is one of the basket we will be making in St. Louis this July with Eric Taylor. The Cottage Purse has a unique handle style and lid attachment and while it has a lot of steps Eric is such a great teacher that he breaks down each each part so that it is a breeze. His wife, Lynne, has a great blog – The Basketmaker's Wife – that you ought to be following, and she documented the process of attaching the rims, handle and lid to this beautiful baskets.


 If you are interested in making this basket or two others with Eric, check out all the information about the workshop I will be hosting.

Friday, April 27, 2012
2012 JoAnn Kelly Catsos Workshop
Thursday - Sunday, October 18, 19, 20, 21, 2012
9:00 am - 5:00 pmI am so excited to be able to offer this workshop to make two beautiful baskets with JoAnn Kelly Catsos of Ashley Falls, MA. JoAnn has won numerous awards for her beautiful black ash baskets and in 1999 she was asked to weave an ornament for the White House Christmas Tree. She also was one of the first to receive the Certificate of Excellence Level I Basketmaking from the Handweavers Guild of America. JoAnn and her husband Steve produce all the weaving materials, hardwood rims and handles, and molds themselves. I hope you can join JoAnn and me for this exciting and fun class.
Thursday, Friday, Saturday
Lidded Knife Basket
8" long x 5" wide x 3" deep (without handle)
8" long x 5" wide x 3" deep (without handle)


$285
Advanced
PLEASE NOTE:
This is a three day advanced workshop
with quadrafoil twill experience mandatory.
|
Sunday
Berkshire Backpack
2" deep x 2 3/4" wide x 4" tall


One of the newest additions to JoAnn’s line of beautiful baskets. Student will weave with finely prepared black ash splint over a multi-piece wooden puzzle mold to create this very small backpack. Insert the handle, lash the ash rims, install the skids to the bottom and buckle on the leather harness–just like a full-size pack. Due to the small size of this basket, patience and attention to detail is helpful.2" deep x 2 3/4" wide x 4" tall


$110
Intermediate
Instructor: JoAnn Kelly Catsos
Contact: Tony Stubblefield
if you would like to receive registration information
Happy 3rd Anniversary!
Wow, I can't believe I started this blog back on April 26, 2009. I can't believe it has been that long. I think this has done what I wanted it to do, be a more dynamic place for me to share basketry related information. I still have my website, JASkets.com, that is more a static gallery of my work and collection and my Facebook page, which is more for quick tidbits of information and quick sharing of information. But, the blog is where I can muse about this and that at a bit more length. Of course I don't post as often as I wish that I could, but boy does life get in the way a lot. I am impressed by people that are able to blog on a weekly, let alone daily, basis. I think I am pretty much busy all the time already, I don't know where they are able to squeeze the time out of.
Anyway, happy third anniversary (or is it birthday?) JASkets blog!
Anyway, happy third anniversary (or is it birthday?) JASkets blog!
Wednesday, April 25, 2012
Basket Impressions

They are clear cling mount stamps and really have a lot of detail to them. Of course it depends on the type of ink you use. For a "grunge" look Distress Inks work great, but you will get a softer image. For word stamps I tend to not like to use Distress Inks, especially if the type is small or fine. Archival inks or Stampin' Up! ink work great too and give you really sharp images. It all depends on the type of look you are going for. Of course if you use Archival inks they will stain your clear stamps, but that doesn't harm the stamps or the impression quality in the least.
I have been thinking about opening an etsy.com shop and will probably go ahead and do that when I get a free weekend to set things up (along with a PayPal account). Of course I will need to reorder the stamps too!
If these continue to be popular I will probably add more designs in the future.
Friday, April 6, 2012
2012 Eric Taylor Workshop
Eric Taylor will be back in St. Louis again this July to teach three great classes. Two of the classes, the Cottage Purse and Cottage Jewelry basket are new designs, so I am excited to be able to offer them. Eric Taylor has been making traditional baskets and Shaker boxes since 1983 when he began an apprenticeship under Martha Wetherbee. His love for working with wood and the black ash trees inspired him to experiment further in the art which lead to creating his own contemporary designs that combined the elements of the Shaker and Nantucket baskets. Eric has taught the art of basketry, nationally, for twenty years.


Workshop Fees
The Cottage Collection
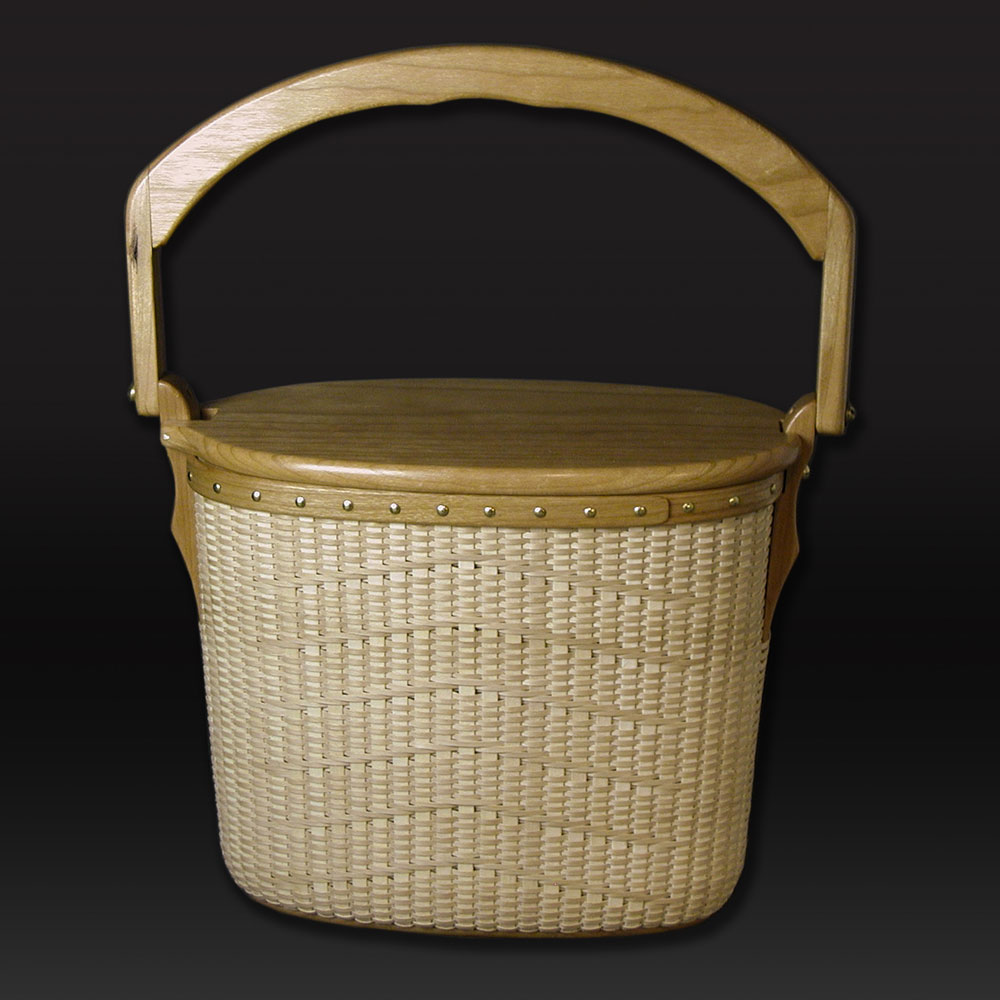
Like a Shaker basket, all of the Cottage Collection are woven with hand-pounded black ash splint over hand-pounded black ash uprights, but like a Nantucket basket feature solid wood bases and nailed rims. Woven over a mold the baskets feature finely shaped cherry handles, notched and secured to the rims.
Saturday and Sunday, July 28 and 29, 2012
9:00 am - 5:00 pm
Cottage Purse
7.5"(l) x 3.25"(w) x 5.5"(h w/o handle)
Intermediate/Advanced
Intermediate/Advanced
Monday, July 30, 2012
9:00 am - 5:00 pm
Cottage Dresser Tote
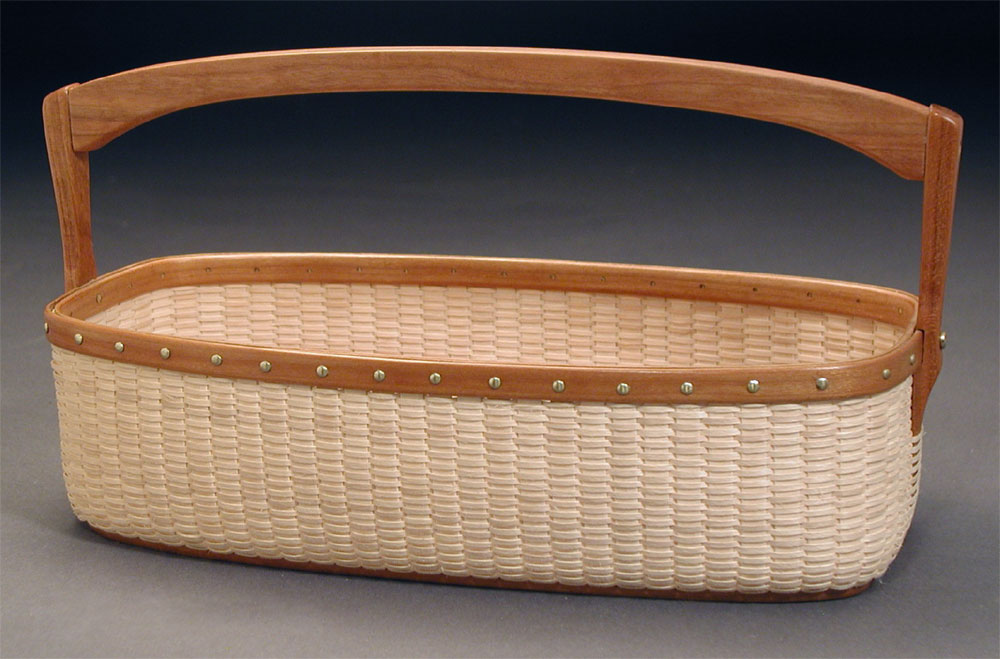
10.5"(l) x 5"(w) x 5.5"(h)
Intermediate
Intermediate
Tuesday, July 31, 2012
9:00 am - 5:00 pm
Cottage Jewelry
Cottage Jewelry
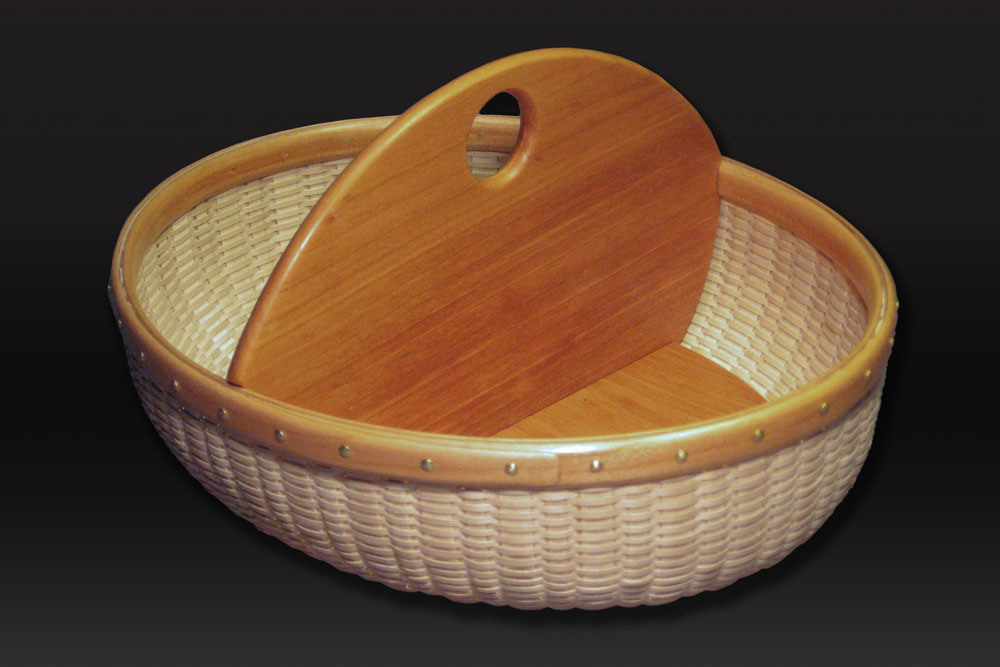
7.25"(l) x 8.5"(w) x 4.25"(h)
Intermediate
Intermediate
Workshop Fees
| Cottage Purse | $245 |
| Cottage Dresser Tote | $150 |
| Cottage Jewelry | $165 |
Class fees include all materials, handouts and use of mold, weaving stand and tools.
Sunday, April 1, 2012
John C. Campbell Folk School - Shaker Box Workshop
I just got home from an exciting week at the John C. Campbell Folk School in Brasstown, NC, where I took a Shaker box making class lead by Lenton Williams. This is my 6th trip to the Folk School and my 6th time taking an incredible class. If you ever have a chance to get to Brasstown, jump on the opportunity.
 The drive from St. Louis to Brasstown, takes you along the Ocoee river, which hosted kayaking competitions during the Atlanta Olympic Games. Depending on the time of year the damns may be open and you can find kayakers and white water rafters.
 Once at the Folk School you are surrounded by nature and peace and quiet. This is a view from the back porch of the Keith House, the main dormitory and office building. I usually stay in this building since I opt for the cheapest housing option. Since you spend so little time in your room, the bunk house style living is really not a problem. This year they just remodeled the bathroom I stayed in, so the newly tiled floor and large shower stall was really nice.
 The wood working studio is located just across the road from the Keith House, so is quite convenient. Every class I have taken at the Folk School has been in this building since the basketry studio is located on the back side. The wood shop is well equipped with a full range of high quality wood working tools.
The week begins with an orientation to the school, dinner and a trip to your studio and introduction to the class.
 Bright and early on Monday we get started. Lendon demonstrated making the middle sized box of the nesting set of five boxes we will all start out with. The boxes are made by soaking a band of thin wood, in near boiling water for about 20 minutes, and then bending it around an oval core. The over-lap is marked and band removed from the core and taken to the vice.
 The swallow-tails are nailed down with tiny copper tacks through pre-drilled holes. Care must be taken to make sure that the tips of the tack cinch over on the inside of the box while not splitting the wood.
 Shapers are inserted into the top and bottom of the bands to maintain the shape of the box. The lid bands are bent around the formed box to create a custom fit. At this point the bands are placed into a drying box.
 Once dried the inside of the bands are carefully traced so that the solid lid and base can be shaped.
 The lid and base plates are rough-cut on a bandsaw then final shaped on the disc sander. The table on the sander is tilted at three degrees to create a beveled edge so the plates are literally wedged into the bands for a super tight fit.
 No glue is necessary on these boxes. The lid and base plates are held in place with tiny pegs. Holes are drilled around the edge of the boxes where the pegs will be inserted and cut off flush.
 Lenton brought a wide selection of bands with the swallow-tails rough cut and pre-drilled for us to choose from.
 Not only did we have a variety of sizes to choose from, we also had a variety of woods, including maple, cherry, walnut burl and curly maple.
 On the first day we get right to work on our own boxes. The flat end of bands are thinned on the belt sander and the swallow tails are beveled with a sharp knife.
 Buy the end of the first day I had my nesting set assembled and ready to be sanded and finished.
 While the smaller boxes a single person can handle by themselves, the larger boxes require a set of helping hands. Here Lenton helps nail the bottom band of a large #8 box.
 The boxes are finished with a coat of oil and buffed with wax for a nice glow.
 One style of box we had the option to make was a #4 swing-handled carrier. For this box holes must be drilled in the sides to accommodate a brass rivet to act as a hinge.
 I made my carrier out of cherry. The swallow-tail fingers are offset to allow for the handle to be centered while not piercing the copper tacks.
 We also had the option of making our own set of cores, or forms to make more boxes once we returned home.
 While the goal was to make eight boxes I ended up making 17, including not only my maple nesting set of 5 five, but also two large button boxes, two presentation boxes with curly maple lids, and three cherry and three maple round pin cushion boxes. Fortunately I had brought my wool fabric with me to make some of my embroidered pin cushions, so was able to make two simple Shaker style cushions for my new boxes.
 On the last day of class at the Folk School everyone gets to see what everyone else was working on all week. Here is our class and the exhibit of some of our boxes.
 Here are the individual boxes I made over my 5 days at the John C. Campbell Folk School.
 On my previous five visits I have always taken a basket class. This session was on making traditional coiled sweet grass, pine needle and palmetto palm baskets. Their baskets turned out great. Guess that will have to be another trip to the Folk School for me.
 Each morning's view was breath taking as the fog lifted over the mountains. I am already counting the months until I can get back to the tiny town of Brasstown, NC and the John C. Campbell Folk School.


The week begins with an orientation to the school, dinner and a trip to your studio and introduction to the class.


Subscribe to:
Posts (Atom)